SEARCH BY CATEGORIES
SEARCH BY INSPIRATIONS
- Air filters
- Brake & Clutch levers
- Electric box
- Exhaust
- Fenders
- Footpegs
- Front protections
- Front suspension
- Front suspension protections
- Fuel tanks
- Handle grips
- Handlebar
- Handlebar switch controls
- Headlights
- License plate holder
- Mirrors
- Mudguards
- Rear frame
- Suspensions
- Seats
- Silencers
- Speedometers
- Taillights
- Thermal strips
- Turn signals
- Air filters
- Belows front suspensions
- Brake & clutch levers
- Electric box
- Engine protection
- Exhaust
- Fenders
- Foot pegs
- Front suspensions
- Fuel tanks
- Handle grips
- Handlebar switch controls
- Handlebars
- Headlights
- License plate holder
- Mirrors
- Mudguards
- Rear frame
- Rear light
- Rear suspensions
- Seats
- Silencers
- Speedometers
- Thermal strips
- Turn signals
- Air filters
- Belows front suspensions
- Brake & Clutch levers
- Electric box
- Exhausts
- Fenders
- Foot pegs
- Front suspensions
- Fuel tanks
- Handle grips
- Handlebar switch controls
- Handlebars
- Headlights
- License plate holders
- Mirrors
- Mudguards
- Rear light
- Rear suspensions
- Seats
- Silencers
- Speedometers
- Thermal strips
- Turn signals
- Air filters
- Belows front suspension
- Brake & Clutch levers
- Electric box
- Exhaust
- Fenders
- Foot pegs
- Front protection
- Front suspensions
- Fuel tanks
- Handle grips
- Handlebar switch controls
- Handlebars
- Headlights
- License plate holders
- Mirrors
- Mudguards
- Rear frame
- Rear light
- Rear suspensions
- Seats
- Silencers
- Speedometers
- Thermal strips
- Turn signals
- Air filters
- Belows front suspensions
- Brake & Clutch levers
- Electric box
- Engine protection
- Exhausts
- Fenders
- Foot pegs
- Front suspensions
- Fuel tanks
- Handle grips
- Handlebar switch controls
- Handlebars
- Headlights
- License plate holders
- Mirrors
- Mudguards
- Rear frame
- Rear light
- Rear suspensions
- Seats
- Silencers
- Speedometers
- Thermal strips
- Turn signals
- Air filters
- Brake & Clutch levers
- Electric box
- Exhaust
- Fenders
- Footpegs
- Front protections
- Front suspension
- Front suspension protections
- Fuel tanks
- Handle grips
- Handlebar
- Handlebar switch controls
- Headlights
- License plate holder
- Mirrors
- Mudguards
- Rear frame
- Suspensions
- Seats
- Silencers
- Speedometers
- Taillights
- Thermal strips
- Turn signals
- Air filters
- Belows front suspensions
- Brake & clutch levers
- Electric box
- Engine protection
- Exhaust
- Fenders
- Foot pegs
- Front suspensions
- Fuel tanks
- Handle grips
- Handlebar switch controls
- Handlebars
- Headlights
- License plate holder
- Mirrors
- Mudguards
- Rear frame
- Rear light
- Rear suspensions
- Seats
- Silencers
- Speedometers
- Thermal strips
- Turn signals
- Air filters
- Belows front suspensions
- Brake & Clutch levers
- Electric box
- Exhausts
- Fenders
- Foot pegs
- Front suspensions
- Fuel tanks
- Handle grips
- Handlebar switch controls
- Handlebars
- Headlights
- License plate holders
- Mirrors
- Mudguards
- Rear light
- Rear suspensions
- Seats
- Silencers
- Speedometers
- Thermal strips
- Turn signals
- Air filters
- Belows front suspension
- Brake & Clutch levers
- Electric box
- Exhaust
- Fenders
- Foot pegs
- Front protection
- Front suspensions
- Fuel tanks
- Handle grips
- Handlebar switch controls
- Handlebars
- Headlights
- License plate holders
- Mirrors
- Mudguards
- Rear frame
- Rear light
- Rear suspensions
- Seats
- Silencers
- Speedometers
- Thermal strips
- Turn signals
- Air filters
- Belows front suspensions
- Brake & Clutch levers
- Electric box
- Engine protection
- Exhausts
- Fenders
- Foot pegs
- Front suspensions
- Fuel tanks
- Handle grips
- Handlebar switch controls
- Handlebars
- Headlights
- License plate holders
- Mirrors
- Mudguards
- Rear frame
- Rear light
- Rear suspensions
- Seats
- Silencers
- Speedometers
- Thermal strips
- Turn signals
PLUS DE MOTO
Add description, images, menus and links to your mega menu
A column with no settings can be used as a spacer
Link to your collections, sales and even external links
Add up to five columns
Add description, images, menus and links to your mega menu
A column with no settings can be used as a spacer
Link to your collections, sales and even external links
Add up to five columns
Add description, images, menus and links to your mega menu
A column with no settings can be used as a spacer
Link to your collections, sales and even external links
Add up to five columns
Add description, images, menus and links to your mega menu
A column with no settings can be used as a spacer
Link to your collections, sales and even external links
Add up to five columns
The guide to building a low-budget cafe racer
February 22, 2021
Guide to building a cafe racer coffee on a tight budget.
To avoid surprises, we advise you to start by defining your project as well as possible in order to have a global vision. With the help of the following steps, you will be able to refine your project.
Step 1: Define your budget

There are two things to consider before you have a number in mind:
- The cost and the work involved are often underestimated.
- We will inevitably forget an element in the calculation.
Once this awareness is realized, we can count on a budget with a safety margin. The budget will balance between the price of the basic motorcycle and the work / parts to be done on it.
Indeed, we can start from a low budget base but it will require more work to make the preparation unique.
Step 2: Choose the bike
This is a crucial step in your preparation.
To stay within a small budget, we will start from a base that requires little modification to be transformed into a cafe racer.
The base must be a little something, a style to bring to the preparation.
Thus for our part, we privilege motorcycles of the end of the 80's and 90's in order to have a rolling base in a very correct state from $1000 to $2000.
As seen in step 1, it is better to put a few hundred dollars more at the purchase to avoid thousands of additional dollars later.
Before purchase, check that expensive parts such as chains/sprockets, tires, suspensions, etc. are also in good condition.
Pour notre sélection, on est parti sur des japonaises d'après 1980 afin d'avoir une moto plaisir, fiable et pouvant donner lieu à de beaux café racers.
The more original the base is and far from a final project, the more time and money will be needed for preparation. The preparation, the motorcycle and the budget must be consistent. Indeed, it requires more resources to make a racer coffee based on Yamaha XJ than on Virago.
For our selection, we started with Japanese women from after 1980 in order to have a motorcycle that is fun, reliable and that can make beautiful cafe racers.
Here is a selection of motorcycles to make you happy:
CX650 & GL650: a very appreciated motorcycle in preparation. We like its mythical engine. We like less the rear loop and the climbing hill.

(source: cyclechaos)
XJ650 & XJ900: a reliable and robust motorcycle. Easy to find. We like the possibilities it offers. We don't like the original fuel tank so much.

(source: zombdrive)
Kawasaki Z 650 & Z 750: The universal Japanese motorcycle. We like its original tank and rims. Rare at less than $2000 in an acceptable condition.

(source: zombdrive)
You should also look at unfinished or "failed" preparations that can lead to good deals:

(source: ebay)
The list is not exhaustive and corresponds only to our aspirations.
For very tight budgets, we advise you to go for the 4 cylinder roadsters of the late 90's and early 2000. These models are very widespread, reliable and very market oriented.
(source: zombdrive)

These include the Honda CB750 Seven Fifty, the Kawasaki Zephyr 750 or the Suzuki Bandit.
Note that this type of preparation will require more work in order to be the "basic" roadster. To be really different.
Another solution, to have a base at a low price is to move towards the smaller 600cc engine sizes.
Step 3: Planning

At the same time as defining the budget, it is advisable to plan the work to be done.
The more important the work is and requires the intervention of external people, the more important the deadlines will be.
It should be noted that, as with the budget, the time required to prepare the cafe racer is underestimated, as well as external factors that may delay the process.
Depending on the preparation, it is reasonable to prepare a motorcycle in 6 to 12 months.
Unfortunately, the willingness to make a cafe racer in less than 2 months can lead to frustration when the goal is not achieved or when the good times are behind you.
Step 4: Parts and materials
The first step is to overhaul the bike if this has not been done.
Depending on the condition of the motorcycle, it is recommended to change all fluids, check brakes, tires, etc... etc.
Given the limited budget, the goal is to keep as many items as possible without impacting the look and safety.
Once this base is healthy we can move on to the modification.
Here are the basic elements that will transform your motorcycle into a racer:
- Cafe racer saddle:

- U frame loop:

- Round headlight

- Tail light

- Turn lights

- Air filter

- Handlebar

- Megaphone exhaust

With these basic elements and according to your budget, you can push the preparation by changing speedometers, handles, mirrors, fuel tank etc..
In addition, materials and equipment will be required to perform the preparation.
The basic element is a well-supplied toolbox.
For painting, one can think of sandpaper, sander, paint, primer...
In case of cutting, a saw, welding material and other.
For the electrical part, electrical tape, heat shrinkable tubing ...
Do not hesitate to ask your friends, the network of friends helps a lot in the preparation. We often have a friend of a friend to realize the welding of the loop, another friend who has a plan for the painting... This saves part of the budget.
Step 5: Preparations
Your project is clear, the motorcycle has arrived in your garage, it's time to attack!
We advise you to document your preparation as much as possible in order to have a quick overview in case of problems and get help easily.
In addition, you will have the satisfaction of the work done if you take pictures regularly.
This step begins with the disassembly of the motorcycle, it is necessary to remove as many elements as possible in order to proceed to a cleaning or a new painting of the frame and the various elements.
The best solution is to expose the frame, clean and store the components to facilitate the next reassembly.
This step also makes it possible to evaluate the condition of the parts.
Depending on the condition of the parts and your level of preparation, you can remove the beam and the motor.
The engine can be removed for overhaul and painting. The wiring harness can be removed for rebuilding and simplification.
Step 6: Cutting out the frame
It is at this stage that the frame is cut if a loop is to be installed, unnecessary appendages, supports and the frame if it is to be modified.
This step is not mandatory, it depends on the parts to be installed and if you want a full preparation.

Indeed, the installation of a cafe racer saddle will require a new loop and supports to accommodate it. The bundle may require a new storage under the saddle.
The U frame is usually changed to harmonize the rear of the bike. The same is true for a fuel tank. If another model is adapted, the original brackets must be removed and new brackets installed for it.
You can also cut out excess elements such as nut holders for fairings.
Once the elements have been removed, the installation of the new elements can begin. It's time to take out the soldering iron or call your plumber friend.
The U frame is placed according to the future saddle. We place the various supports.
It is at this moment that we put all the elements in blanks in order to validate all the parts before painting.
Step 7: Painting, repair or simple cleaning.
Depending on what you have done in the previous step, a simple cleaning can be enough to a complete epoxy paint job.
Once the painting of the frame is done, you have to take care of all the other elements such as the fork sleeves, the accessories, the wheels...
It is the same for the tank, which you have chosen. If it is a second hand tank, a refurbishment with an interior protection can be a bit of putty and it will be ready to ride for years to come.
For painting, there are quality sprays available these days to do a professional job. It is advised to be patient and to carry out all the steps (sanding, primer, painting) as meticulously as possible in order to have a perfect result.

Example of a red thermolacquered paint for a customer's bobber.
For an optimal result, you can use spray paint or epoxy paint.
This step can be laborious, it may be wise to refer you to a professional according to your desire and budget.
Once the paint has been applied, the parts must be protected as much as possible so as not to damage them during reassembly.
Step 8: Reassembly
The reassembly is the most exciting step, we see the work done for months and our imagined project merged before our eyes.
Here is an example of bjmgdesign:
From the drawing:

To the result:
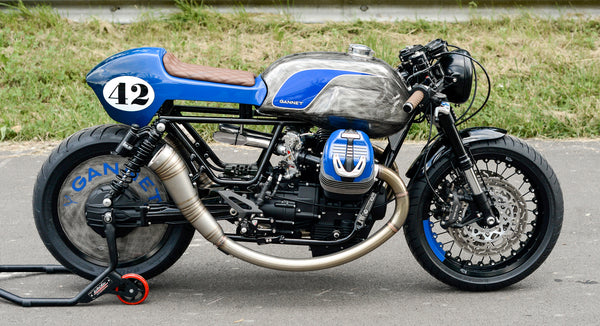
Normally, with the blank test, the reassembly goes smoothly.
Do not forget to take care not to forget any parts, screws or nuts. This could have dangerous consequences.
Test the parts before putting them in place and test them together with a few other parts, especially spare parts. Rather than putting something on and taking it off over and over again, if you test it, you can usually put things on once and not have to undo them again.
While being careful not to damage the freshly applied paint on your parts.
Once reassembly is complete, we check that all parts are working before doing a road test. We make the levels and run the engine.
Step 9: It's the big day
And here it is, the cafe racer is ready, your cafe racer. You can be proud.
You have just built a cafe racer, your own creation, unique and it will teach you a lot.
It may be difficult, but it's time to start enjoying your café racer.
And why not, make another one :)
Leave a comment
Comments will be approved before showing up.

